-
Installing and configuring a wireless home network using a D-Link router
-


Steps to create a D-Link wireless home network
Creating a D-Link DI-624 wireless home network requires six steps:
-
Step 1: Verify installation
-


Steps to create a D-Link DI-624 wireless home network
Before you begin creating a home network, confirm that your D-Link DI-6234 router is functioning properly. The easiest way to do this is to verify you can connect to the Internet.
- Open Internet Explorer or any other browser on your computer.
- Enter http://verizon.com into the Address field. The Verizon home page should display.
- If the Verizon home page does not display, refer to the D-Link router troubleshooting tips. After you have solved the problem, repeat this test.
-
Step 2: Preparations
-


Steps to create a D-Link Di-624 wireless home network
Before you begin setting up your wireless network be sure that you have completed each item on the checklist below.
 Review the wireless networking system requirements
 Review the factors to consider before installing your wireless network.
 Verify you have the required network adapters and accessories:
- D-Link Wireless USB adapterfor each desktop computer you are connecting to your network.
- D-Link Wireless USB adapter or D-Link Wireless Notebook adapter for each notebook computer you are connecting to your network.
- Many newer computers are sold with wireless network adapters installed.
-
Step 3: Setting up your home network
-


Steps to create a D-Link DI-624 wireless home network
Although you can set up a home network in earlier versions of Windows, you will find it significantly easier if the computer connected to the router is running Windows XP. Windows XP was designed with features and installation wizards specifically for home networking.
1. Click Start in the left Taskbar. Download the Windows Setup instructions for easy printing.
2. Click All Programs
3. Click Accessories
Note: The name cannot contain spaces or special characters.
Note: The workgroup name cannot contain any spaces or special characters.
4. Click Communications
5. Select Network Setup Wizard
6. Click Next when the Welcome to the Network Setup Wizard displays. [Show Me]
7. Review the preparation steps and click Next. Please disregard the note to install the network adapters and turn on all peripherals. That will be done in a later step.
8. If the disconnected network hardware window displays, select Ignore disconnected network hardware and click Next. [Show Me]
9. Select Other as the Internet connection method and click Next.
10. Select This computer connects directly to the Internet. I do not have a network yet as the specific Internet connection method and click Next.
11. Enter a description in the Computer description field for the computer you are connecting to the gateway. It should be a description that differentiates it from the other computers that will be on the network (For example, office desktop).
12. Enter a name for this computer in the Computer name field. The name cannot contain any spaces or special characters.
Note: The name cannot contain spaces or special characters.
13. Enter a name for your network workgroup in the Workgroup name field and click Next. All computers connected to your network must be assigned to the same workgroup.
Note : The workgroup name cannot contain any spaces or special characters.
14. Verify the network settings you have entered and click Next.
15. Select Create a Network Setup Disk and click Next. [Show Me]
16. Select the drive where you want to save the information from the options displayed and click Next. [Show Me]
17. Follow the directions for the type of drive you selected and click Next.
18. Review the instructions for using the setup disk.
-
Step 4: Configuring the wireless security settings on your D-Link router
-


Steps to create a D-Link DI-624 wireless home network
Security is an important issue when using a wireless home network. Because radio waves are used to transfer information between your networked computers, it's possible for hackers to intercept this information. Taking advantage of the security features built into your D-Link router can make it much more difficult for hackers to access your personal information.
The level of protection required for your home network is dependent on the type of information stored on your home network. You have to decide what level of protection you need and how you are going to provide that protection. This section provides information on the most basic steps to increase the security of your home network. It is not intended to include a description of all the possible security features provided by the D-Link router.
Take a few minutes now to improve the security of your home network by changing the initial settings of your D-Link router to provide the level of protection you need. Periodically, you should maintain the security of your home network by changing your router password, SSID, and WEP key.
Note: You may have already completed some of the initial security updates listed below during installation. Simply skip the steps that you have already completed.
Initial Security Settings
Change the wireless settings1. Open your Web browser and enter http://192.168.0.1 in the Address field.
 Download the complete instructions for printing
2. Enter your router user name and password. If you haven't changed your router user name and password, enter admin in the User Name field and leave the Password field blank. [Show Me]
- If you have changed your user name or password and have forgotten the new entries, you can reset your D-Link router to the factory defaults so you can access the configuration screens.
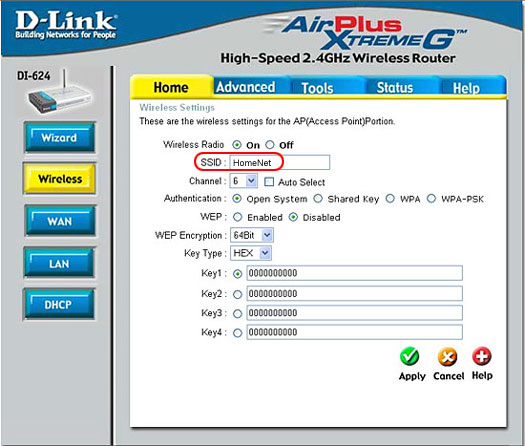
3. When the D-Link Configuration screen displays, confirm that the Home tab is selected and click Wireless.
Change your default router password
Your D-Link router's default values of "admin" as the user name and no entry in the Password field are well-known to hackers. If these values are not changed, it's easier for hackers to access your network and information. It's important that you not only change your user name and password from the default, but that you continue to change it regularly.
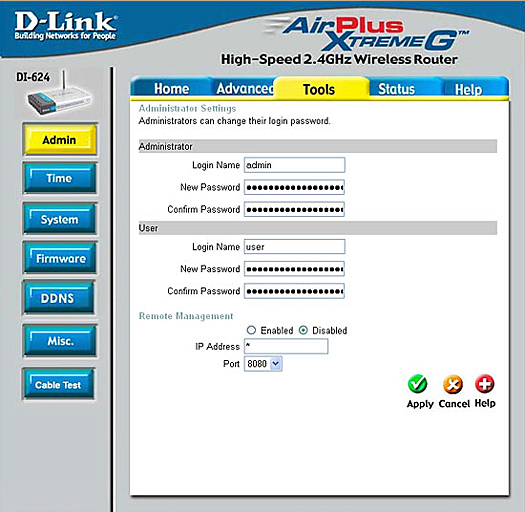
There are two accounts set up on your router: the User and Administrator accounts. Because the Administrator account can make changes to your network settings, it's very important to change the Administrator user name and password.- Select the Tools tab and click Admin.
- Enter a new Administrator user name in the Login Name field.
- Enter a new password in the New Password field.
- Enter the password again in the Confirm Password field.
- Click Apply.
Enable MAC Address filtering
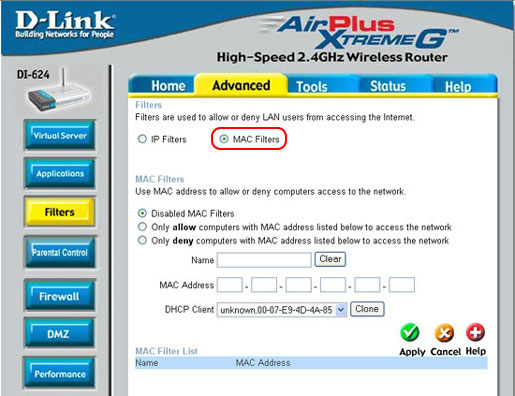
You can limit access to your home network to increase the security of the information stored on it. MAC address filtering allows you to specify the computers that can access the network. This makes it much more difficult for hackers to break into your home network.
Each computer is assigned a MAC address. You will use this MAC address to specify the only computers allowed to connect to your home network.
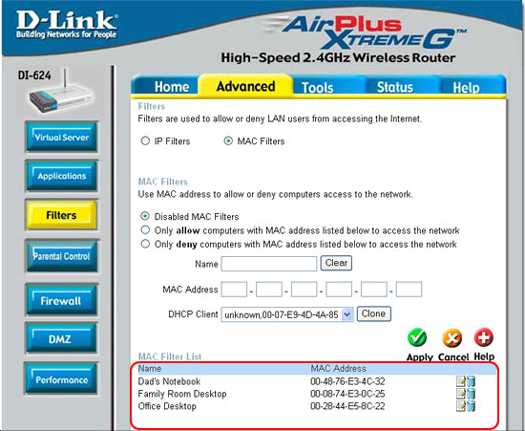
5. Enter a name for the computer you're allowing access to your network in the Name field. You may want to give it a descriptive name like Dad's notebook or Family Room Desktop. [Show Me]
6. Enter the computer's MAC Address. [Show Me]
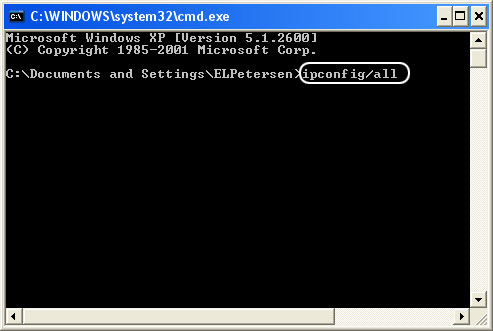
Note: If you don't know the MAC Address of the computers on your home network, you can use the command prompt in your Windows operating system to find it.7. Click Apply. The computer will be added to the MAC Filter List.
8. Repeat Steps 5 - 7 for each computer you are allowing to access your home network.
9. When you have entered the MAC address of each computer that will be connected to your network, select Only allow computers with MAC address listed below to access the network. [Show Me]
10. Click Apply. Now, only computers included in this list will be allowed to access your home network.
Block WAN requests
You can increase your home network security by using the Block WAN Ping feature. This prevents your router from responding to anyone pinging your WAN IP address. Hackers ping public WAN IP addresses to determine if a WAN IP address is valid. If you select Enabled in the Discard PING from WAN side, your D-Link router won't respond to the electronic signal (ping), and the hacker won't receive a message back verifying whether the WAN IP address is valid.
- Select the Tools tab and click Misc.
- Select Enabled for the Discard PING from WAN side setting.
-
Step 5: Adding other computers to your D-Link wireless home network
-


Steps to create a D-Link DI-624 wireless home network
If you have additional computers you want to connect to your wireless network, please follow the directions below. If you have no additional computers to connect, you can skip to Step 6.
The instructions for adding a computer to your wireless network depends on whether the computer you're adding has a wireless network adapter already installed.
If your computer has a wireless adapter built in or you have previously installed a wireless network adapter, you only need to set up the connection to the wireless network. The directions are much simpler and generally take less than five minutes to complete. If you're unsure about whether you have a wireless network adapter, you can use Windows Device Manager to determine whether you have one installed.
If you don't have a wireless network adapter installed, connecting an additional computer will require two major steps:
- Configure Windows on the computers you are adding to the network so they have the correct components for home networking installed.
- Connect the other computers to your home network using Ethernet cable or wireless network adapters.
Note: If you're creating a wireless network for a single laptop computer, you can skip this step and continue with Step 6.


Steps to create a D-Link DI-624 wireless home network in Windows XP
There are two options for connecting additional computers to your home network.
- Create a completely wireless network by installing and configuring wireless network adapters for each computer.
- Create a combination network by connecting any computers that are close to your router with Ethernet cable. Then install wireless network adapters to connect notebook computers or computers that are farther away from the router.
Review the advantages that each type of connection provides to determine the best solution for your situation.
Completely Wireless Home Network
- No wires to clutter your work space
- Provides the most flexibility, especially for notebook computers
- Requires purchasing a wireless network adapter for each additional computer
Combination Home Network
- Faster data flow and more security from hackers for the computers connected by Ethernet cable
- Less expensive. Computers close to the router and connected by Ethernet cable use a network interface card that is much less expensive than a wireless network adapter
- Easier installation for computers connected by Ethernet cable
Connect additional computers by selecting either a completely wireless or a combination network.
-
Step 6: Testing your Internet Connections
-


Steps to create a D-Link DI-624 wireless home network
The final step is to test your Internet connection on each computer on your home network. This ensures that all the connections are secure, and the hardware configurations are working properly.
- Open your Internet browser on the computer connected to your gateway.
- Enter http://www.verizon.com in the Address field. The Verizon home page should display.
- Note: If you cannot connect to the Internet, refer to the D-Link troubleshooting tips.
- Note: If you cannot connect to the Internet, refer to the D-Link troubleshooting tips.
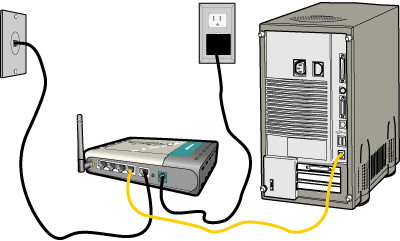
- If you want a completely wireless network, remove the Ethernet cable (yellow in the illustration below) that connects your computer to the D-Link router.


Steps to create a D-Link DI-624 wireless home network in Windows XP
There are two options for connecting additional computers to your home network.
- Create a completely wireless network by installing and configuring wireless network adapters for each computer.
- Create a combination network by connecting any computers that are close to your router with Ethernet cable. Then install wireless network adapters to connect notebook computers or computers that are farther away from the router.
Review the advantages that each type of connection provides to determine the best solution for your situation.
Completely Wireless Home Network
- No wires to clutter your work space
- Provides the most flexibility, especially for notebook computers
- Requires purchasing a wireless network adapter for each additional computer
Combination Home Network
- Faster data flow and more security from hackers for the computers connected by Ethernet cable
- Less expensive. Computers close to the router and connected by Ethernet cable use a network interface card that is much less expensive than a wireless network adapter
- Easier installation for computers connected by Ethernet cable
Connect additional computers by selecting either a completely wireless or a combination network.
What's Next?
You have successfully installed your wireless home network. When you're ready, the next step to get the maximum benefits from your home network is to configure Windows to share folders and printers.
-
-
Minimum System requirements for a wireless D-Link DI-624 home network
-
Wireless Router
- Operating System: Windows 98 SE, Windows Me, Windows 2000, or Windows XP
- Browser: Internet Explorer 6.0 or above, or Netscape 6.0 or above.
Wireless notebook adapter*
- Notebook computer with an available 32-bit cardbus slot
- Processor: 300 MHz
- RAM: 32 MB
Wireless USB adapter*
- Desktop or notebook computer with an available USB port
- Operating System: Windows 98 SE, Windows Me, Windows 2000, or Windows XP
- Processor: 300 MHz
- RAM: 32 MB
* Can be purchased at your local computer store
-
Required equipment for a wireless home network using a D-Link router
-
- D-Link wireless router
- Wireless USB Network Adapter for each desktop computer linked to the network
- A wireless USB Network Adapter or wireless Notebook Adapter for each notebook computer linked to the network
Note: Many new notebook computers have built-in wireless network cards. Be sure to check your notebook computer to see if it already has a network card.
-
What factors should I consider when planning my wireless network?
-
Before installing your wireless network, you should consider:
- Using the same operating system on all the computers connected to your network.
- Placing your wireless router or gateway at least 10 feet from cordless phones or microwaves to avoid potential interference.
- Positioning your wireless router or gateway away from heat sources, moisture, excessive dust, or extreme cold.
- Locating the wireless router or gateway as high and to the center of the network area as possible, especially if you have a large area to cover or thick/dense walls. The wireless router is generally able to go through two or three walls before it loses connectivity.
- Positioning the devices connected to your network so the signals will go straight through a wall rather than at an angle. If the signal hits a wall at an angle, the signal appears much larger and decreases its strength.
- Keeping the number of walls and ceilings between your router and the other devices on your network to a minimum.
- Placing the wireless router or gateway near a window if you want to access the network outside.
- Keeping the wireless router or gateway away from any large metal objects, because they may adversely impact signal quality and speed.
-
Resetting your D-Link DI-624 router to the factory settings
-
If you have forgotten your router's user name or password, you must reset the router to the factory settings to access the configuration utility. You can't update any security settings unless you know the user name and password and can access the router's configuration utility.
- Note: Resetting your D-Link router clears all of your home networking settings.
To reset your D-Link router:
- With the power on (Power LED on front panel should be lit green), use the pointed end of a paper clip to press and hold the Reset button for 10 seconds.
2. Release the Reset button. The D-Link router will automatically reboot itself.
3. Wait 15 seconds before resuming setup.
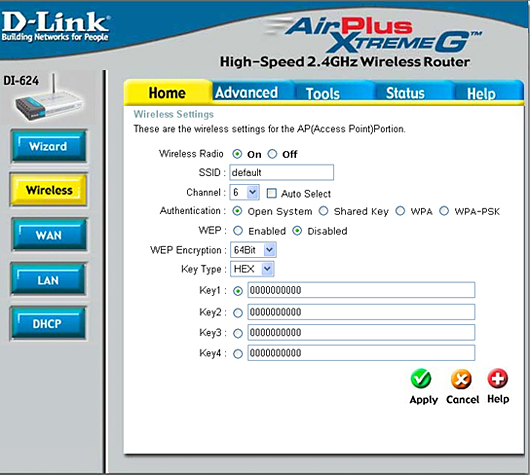
4. Your D-Link DI-624 router is now using the default settings for the network configuration. This includes the default SSID and WEP encryption key. You must re-configure your D-Link router to match the previous settings that were assigned to all the other devices on your wireless network. Otherwise, no other network devices will be recognzied.
-
Finding your computer's MAC address in Windows XP
-
- Click Start in the lower left taskbar.
- Select Run from the Start menu.
- Enter Cmd in the Open field of the Run window.
4. Enter ipconfig/all
5. Write down the Physical Address. This is another name for the MAC address. It should be 12 characters (6 pairs of characters separated by hyphens). You will enter this MAC address without the hyphens when you set up the MAC address filtering
6. Enter exit and press [Enter] to close the Command window
-
Reconfiguring your D-Link DI-624 network after resetting the router
-
- Open your Web browser and enter http://192.168.0.1 in the Address field. [Show Me]
- Enter your router user name and password if prompted and click Ok. Because you have reset your router, you must enter the default values of "admin" as the user name and leave the Password field blank.
- When the D-Link Configuration screen displays, confirm that the Home tab is selected and click Wireless in the left navigation panel. [Show Me]
- Confirm that On is selected in the Wireless Radio field. [Show Me]
- Enter your network's SSID. You must enter the same SSID previously assigned to all the computers and network adapters connected to your wireless network.
- Open your Web browser and enter http://192.168.0.1 in the Address field. [Show Me]
-
Entering your network security settings
-
1. When you reset your D-Link DI-624 router to the default settings, it reverted to WEP encryption and is using the default encryption key.
- If your other wireless network devices are configured to use the default WEP encryption key, you can click Apply to save your settings and then close the configuration window. No other actions are needed.
- If your other wireless network devices are configured to use a different WEP encryption key, you will need to enter the updated WEP encryption key.
- If you strengthened your network security by configuring your wireless network to use WPA-PSK encryption, you must re-enter all your WPA encryption settings.
-
Re-entering your WEP encryption settings
-
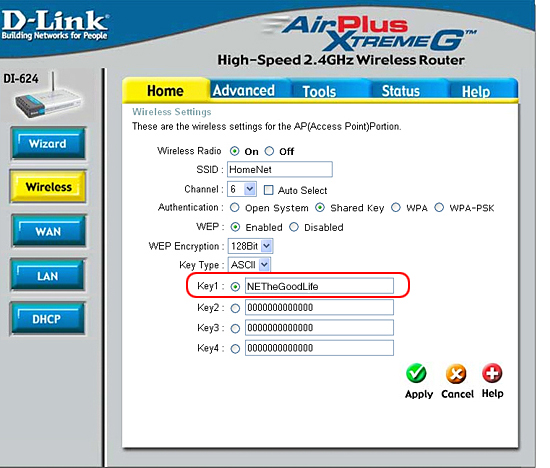
1. Confirm that Shared Key is selected in the Authentication field. [Show Me]
2. Confirm that Enabled is selected for the WEP setting. [Show Me]
3. Set the WEP Encryption field to the same level of protection (64Bit or 128Bit) you assigned to the other computers and devices connected to your wireless network. [Show Me]
4. Select ASCII or Hex in the Key Type field. It must be the same as assigned to the other computers and devices connected to your network. [Show Me]
5. Select the Key field (1 - 4) where you entered the WEP encryption key (Key1 in the example above). [Show Me]
6. Enter the WEP encryption key you assigned to all the other computers and devices connected to your network
7. Click Apply to save your SSID and WEP encryption settings.
8. Close the D-Link configuration window.
-
Re-entering your WPA-PSK network security settings
-
1. Select WPA-PSK in the Authentication field. [Show Me]
2. Enter the WPA-PSK encryption key that was assigned to the other computers and network adapters connected to your wireless network in the Passphrase field.
3. Confirm your WPA-PSK encryption key by re-entering it in the Confirmed Passphrase field.
4. Click Apply to save your new encryption settings.
5. Close the D-Link DI-624 configuration window.
-
Connecting to your D-Link DI-624 wireless network
-


Steps to create a D-Link DI-624 wireless home network in Windows XP
- Boot up the computer you want to connect to your network and click Start in the lower left Taskbar.
- Select Control Panel. [Show Me]
- Double-click Network Connections. [Show Me]
- Right click the icon for your wireless adapter and select View Available Wireless Networks. [Show Me]
- Select the network you want to join in the Choose a Wireless Network window and click Connect.
6. Enter your network's encryption key, if you're prompted.
7. The status will change to "Connected" when you have successfully connected to the selected network. [Show Me]
- Boot up the computer you want to connect to your network and click Start in the lower left Taskbar.
-
Configuring Windows for home networking on the additional computers
-
When you configured the computer attached to your router, you saved your Windows home networking information to a flash drive or to a removable media like a floppy disc. In this step, you will use this saved information to configure the computers you're connecting to your home network.
Note: If you are connecting computers running Windows 98 SE or Windows Me to your home network, you must use the flash drive or removable media to start the Network Setup Wizard.
To configure Windows for home networking:1. Insert the removable media into the appropriate type of drive on your computer. If you saved the information to a flash drive, insert the flash drive into an available USB port Download the complete instructions for easy printing
Note: If your computer is running Windows XP, you can access the Network Setup Wizard without using the removable media saved when you connected your first computer to the router.
2. Double-click the My Computer icon on your desktop.
3. Navigate to the drive containing the removable media (floppy disk, flash drive, etc.).
4. Double-click the icon or drive letter of the drive holding the removable media.
5. Double-click the netsetup.exe file. The Network Setup Wizard will start automatically.
-
Starting the Network Setup Wizard
-


Steps to create a D-Link DI-624 wireless home network in Windows XP
1. Click Yes if a dialog box displays informing you that some network support files need to be installed.
2. Click Next when the Welcome to the Network Setup Wizard screen displays.
3. Click Next when the "Before you continue" screen displays.
-
Selecting the Internet connection type
-


Steps to create a D-Link DI-624 wireless home network in Windows XP
1. Select This computer connects to the Internet through another computer on my network or through a residential gateway in the "Select a connection method" screen.
2. Enter a description for this computer in the Computer description field. It should differentiate it from the other computers on your network. [Show Me]
3. Enter a descriptive name in the Computer name field for this computer. This is how it will be listed on your network. [Show Me]
Note:The computer name cannot contain any spaces or special characters.
4. Enter the workgroup name for this computer. All the computers connected to this network must be assigned to the same workgroup. [Show Me]
Note:The workgroup name cannot contain any spaces or special characters.
-
Review your setting
-


Steps to create a D-Link DI-624 wireless home network in Windows XP
1. Review your settings to make sure they are correct.
- If they are correct, click Next.
- Click Back to make any necessary changes.
2. Your computer will automatically be configured for your home network. [Show Me]
-
Finishing the Network Setup Wizard
-


Steps to create a D-Link DI-624 wireless home network in Windows XP
1. Select Just finish the wizard; I don't need to run the wizard on other computers and click Next. You will use the same flash drive or removable media that you used on this computer to configure the remaining network computers. You don't need to create another setup disk
2. Click Finish when the "Completing the Network Setup Wizard" screen displays. [Show Me]
* Verizon does not recommend use of Windows 98, Windows 98 SE, or Windows Me. On July 11, 2006, Microsoft discontinued support for Windows 98, Windows 98 SE, and Windows Me.
Because Microsoft will not provide security updates for these operating systems, we recommend that you upgrade to a supported version immediately to ensure the best possible performance. For additional information, visit Microsoft Support at http://support.microsoft.com.
Continue by connecting this computer to your home network
-
Connecting additional computers to your home network
-


Steps to create a D-Link DI-624 wireless home network in Windows XP
There are two options for connecting additional computers to your home network.
- Create a completely wireless network by installing and configuring wireless network adapters for each computer.
- Create a combination network by connecting any computers that are close to your router with Ethernet cable. Then install wireless network adapters to connect notebook computers or computers that are farther away from the router.
Review the advantages that each type of connection provides to determine the best solution for your situation.
Completely Wireless Home Network
- No wires to clutter your work space
- Provides the most flexibility, especially for notebook computers
- Requires purchasing a wireless network adapter for each additional computer
Combination Home Network
- Faster data flow and more security from hackers for the computers connected by Ethernet cable
- Less expensive. Computers close to the router and connected by Ethernet cable use a network interface card that is much less expensive than a wireless network adapter
- Easier installation for computers connected by Ethernet cable
Connect additional computers by selecting either a completely wireless or a combination network.


1.jpg)
