-
WEP to WPA2 or WPA
-
Change your Wireless Network from WEP to WPA2 or WPA

Verizon recommends using the strongest network encryption compatible with your network devices. In most cases, that is WPA2 encryption. However, you will notice some of the older devices below may not be compatible with WPA2 encryption. In those instances, WPA is the preferred encryption because it is still stronger than WEP.
For step-by-step instructions for upgrading your network security, select the router you are using and the type of encryption you prefer.
Verizon 9100VM Router


Verizon 9100EM Router
Change to WPA2Verizon MI424WR Router

D-Link DI-624 Router

Actiontec MI424WR Router
Upgrade to WPA2IMPORTANT NOTE: While we strongly recommend that you upgrade to WPA2 and that you create a strong, unique encryption key/password, if you prefer to use less-secure WEP encryption, it is critical that you create a strong, unique WEP encryption key / password and change it regularly. Please do NOT use the WEP encryption key that is printed on the label of your router. The following link will provide instructions on how to create a strong, unique WEP encryption key / password: change encryption key
-
Setting up WPA2 encryption on your Verizon 9100EM or 9100VM wireless home network
-
Note: The configuration screens may vary slightly depending on when you purchased your router and the version of firmware running on it.
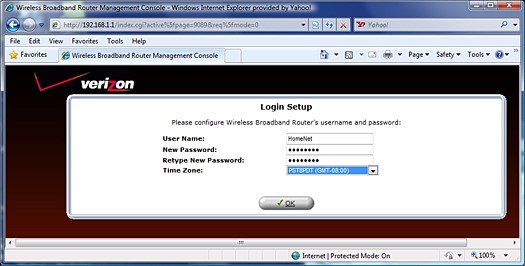
- Open a Web browser like Internet Explorer or Firefox and enter http://192.168.1.1 in the Address field. [Show Me]
- Enter a user name in the User Name field.
- Enter a strong password for your network in the New Password field. The password must be at least 6 characters long and include at least one alphanumeric character.
- Re-enter your password in the Retype New Password field.
- Select your time zone in the Time Zone field and click OK.
- Click the Wireless Settings icon at the top of the screen.
-
Entering a name for your home network
-
Creating a wireless network with a Verizon 9100EM router in Windows XP
1. Click Basic Security Settings in the left navigation panel.
2. Confirm that On is selected in the Wireless field to turn on the wireless features of your router.
3. If you're creating a new home network, it's recommended that you use the default SSID assigned by Verizon and displayed in the SSID field. This simplifies network installation and makes troubleshooting easier. Since each router has its own assigned SSID, there isn't a loss of security by keeping the default value.
- The default SSID is displayed on the label attached to the bottom of your router for easy reference.
- All hardware attached to your home network must be assigned the same SSID.
If you're replacing the router on an established home network, you may want to change the default SSID to that of your previous network. This eliminates the need to change the SSID on all the wireless network adapters used to connect additional computers.- If you change the SSID, it's important that you write it down for future reference. All hardware connected to your home network must use the same SSID.
4. Leave the default of Automatic in the Channel field.
-
Selecting the type of network encryption
-
Creating a wireless network with a Verizon 9100EM router in Windows XP
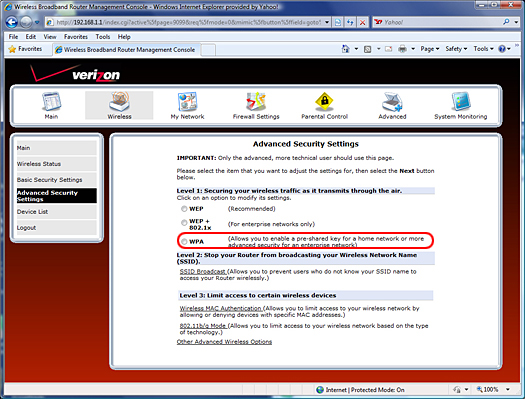
1. Click Advanced Security Settings in the left navigation panel. [Show Me]
2. Select WPA in the Level 1 section to enable WPA network encryption.
-
Entering the WPA2 encryption key
-
Creating a wireless network with a Verizon 9100EM router in Windows XP
1. Select WPA2 in the Stations Security Type field. [Show Me]
2. Confirm that Pre-Shared Key is selected in the Authentication Method field. [Show Me]
3. Select the format for entering your WPA2 encryption key. You can enter your WPA2 encryption key in ASCII (combination of numbers and letters) or hex (combination of numbers 0 - 9 and letters A - F) format. [Show Me]
o Note: You may want to use the ASCII format because you can choose a phrase that's easier to remember. For example, you could enter "EnjoySummerBe4Its2L8" as your encryption key if you're using the ASCII format.
4. Enter your WPA2 encryption key in the Pre-Shared Key field.
o If you use the hex format, your encryption key must be 64 characters long.
o If you use ASCII format, your encryption key must be between 8 and 63 characters long.

-
Setting the encryption key update interval
-
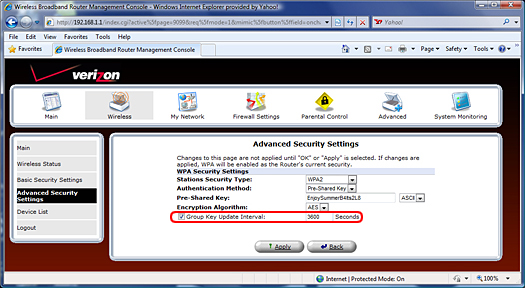
1. Confirm that AES is selected in the Encryption Algorithm field. [Show Me]
2. Confirm that Group Key Update Interval is selected. One of the strengths of WPA2 encryption is that it self-generates a new key based on the original encryption key you enter. By enabling this field, you can control the time interval between the creation of the new encryption keys.
3. If you enabled Group Key Update Interval in the previous step, enter the number of seconds before a new encryption key is automatically created. You may want to consider a setting around 3600 seconds for the Group Key Update Interval. [Show Me]
4. Click Apply to save your WPA2 settings
-
How can I change my Verizon 9100EM or 9100VM network to WPA security?
-
If your network devices aren't compatible with WPA2 encryption, WPA is your next best choice for network security. It has fewer incompatibilities than WPA2 and is stronger than WEP encryption.
Note: The configuration screens may vary slightly depending on when you purchased your router and the version of firmware running on it.1. Open your Web browser and enter http://192.168.1.1 in the Address field.

2. If prompted, enter your router user name in the New User Name field and your password in the New Password field. The password must be at least 6 characters long and include at least one alpha numeric character. [Show Me]
3. Re-enter your password in the Retype New Password field.
4. Select your time zone in the Time Zone field.
5. Click the Wireless Settings icon at the top of the screen.
-
Selecting the type of network encryption
-
1. Click Advanced Security Settings in the left navigation panel. [Show Me]
2. Select WPA in the Stations Security Type field.
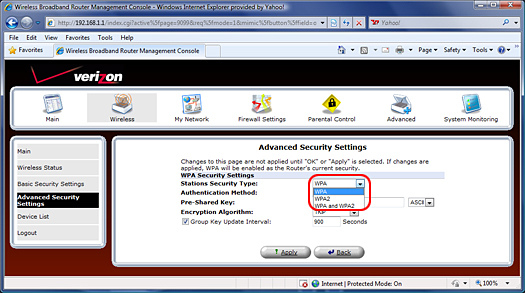
3. Confirm that Pre-Shared Key is selected in the Authentication Method field. [Show Me]
4. Select the format for entering your WPA encryption key. You can enter your WPA encryption key in ASCII (combination of numbers and letters) or hexadecimal (combination of numbers 0 - 9 and letters A - F) format. [Show Me]
o Note: You may want to use the ASCII format because you can choose a phrase that's easier to remember. For example, you could enter "EnjoySummerBe4Its2L8" as your encryption key if you're using the ASCII format.
5. Enter your WPA encryption key in the Pre-Shared Key field.
o If you use the hexadecimal format, your encryption key must be 64 characters long.
o If you use ASCII format, your encryption key must be between 8 and 63 characters long.

-
Setting the group key update interval
-
1. Confirm that AES is selected in the Encryption Algorithm field. [Show Me]
2. Confirm that Group Key Update Interval is selected. One of the strengths of WPA encryption is that it self-generates a new key based on the original encryption key you enter. By enabling this field, you can control the time interval between the creation of the new encryption keys.
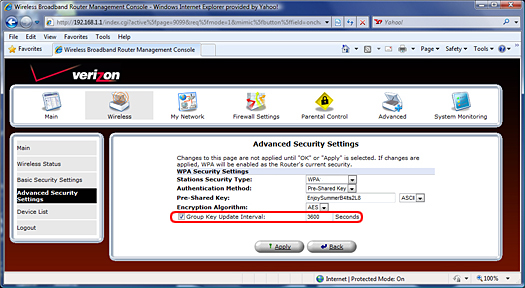
3. If you enabled Group Key Update Interval in the previous step, enter the number of seconds before a new WPA encryption code is automatically generated. You may want to consider a setting around 3600 seconds for the Group Key Update Interval. [Show Me]
4. Click Apply to save your WPA settings.
-
Setting up WPA2 encryption on your Verizon 9100EM or 9100VM wireless home network
-
Note: The configuration screens may vary slightly depending on when you purchased your router and the version of firmware running on it.
- Open a Web browser like Internet Explorer or Firefox and enter http://192.168.1.1 in the Address field. [Show Me]
- Enter a user name in the User Name field.
- Enter a strong password for your network in the New Password field. The password must be at least 6 characters long and include at least one alphanumeric character.
- Re-enter your password in the Retype New Password field.
- Select your time zone in the Time Zone field and click OK.
- Click the Wireless Settings icon at the top of the screen.

-
Entering a name for your home network
-
Creating a wireless network with a Verizon 9100EM router in Windows XP
1. Click Basic Security Settings in the left navigation panel.
2. Confirm that On is selected in the Wireless field to turn on the wireless features of your router.
3. If you're creating a new home network, it's recommended that you use the default SSID assigned by Verizon and displayed in the SSID field. This simplifies network installation and makes troubleshooting easier. Since each router has its own assigned SSID, there isn't a loss of security by keeping the default value.
o The default SSID is displayed on the label attached to the bottom of your router for easy reference.
o All hardware attached to your home network must be assigned the same SSID.
If you're replacing the router on an established home network, you may want to change the default SSID to that of your previous network. This eliminates the need to change the SSID on all the wireless network adapters used to connect additional computers.
1. If you change the SSID, it's important that you write it down for future reference. All hardware connected to your home network must use the same SSID.
2. Leave the default of Automatic in the Channel field.
-
Selecting the type of network encryption
-
Creating a wireless network with a Verizon 9100EM router in Windows XP
1. Click Advanced Security Settings in the left navigation panel. [Show Me]
2. Select WPA in the Level 1 section to enable WPA network encryption.

-
Entering the WPA2 encryption key
-
Creating a wireless network with a Verizon 9100EM router in Windows XP
1. Select WPA2 in the Stations Security Type field. [Show Me]
2. Confirm that Pre-Shared Key is selected in the Authentication Method field. [Show Me]
3. Select the format for entering your WPA2 encryption key. You can enter your WPA2 encryption key in ASCII (combination of numbers and letters) or hex (combination of numbers 0 - 9 and letters A - F) format. [Show Me]
Note: You may want to use the ASCII format because you can choose a phrase that's easier to remember. For example, you could enter "EnjoySummerBe4Its2L8" as your encryption key if you're using the ASCII format.
Enter your WPA2 encryption key in the Pre-Shared Key field.
o If you use the hex format, your encryption key must be 64 characters long.
o If you use ASCII format, your encryption key must be between 8 and 63 characters long.

-
Setting the encryption key update interval
-
Creating a wireless network with a Verizon 9100EM router in Windows XP

1. Confirm that AES is selected in the Encryption Algorithm field. [Show Me]
2. Confirm that Group Key Update Interval is selected. One of the strengths of WPA2 encryption is that it self-generates a new key based on the original encryption key you enter. By enabling this field, you can control the time interval between the creation of the new encryption keys.
3. If you enabled Group Key Update Interval in the previous step, enter the number of seconds before a new encryption key is automatically created. You may want to consider a setting around 3600 seconds for the Group Key Update Interval. [Show Me]
4. Click Apply to save your WPA2 settings
-
How can I change my Verizon 9100EM or 9100VM network to WPA security?
-
If your network devices aren't compatible with WPA2 encryption, WPA is your next best choice for network security. It has fewer incompatibilities than WPA2 and is stronger than WEP encryption.
Note: The configuration screens may vary slightly depending on when you purchased your router and the version of firmware running on it.1. Open your Web browser and enter http://192.168.1.1 in the Address field.

2. If prompted, enter your router user name in the New User Name field and your password in the New Password field. The password must be at least 6 characters long and include at least one alpha numeric character. [Show Me]
3. Re-enter your password in the Retype New Password field.
4. Select your time zone in the Time Zone field.
5. Click the Wireless Settings icon at the top of the screen.
-
Selecting the type of network encryption
-
1. Click Advanced Security Settings in the left navigation panel. [Show Me]
2. Select WPA in the Stations Security Type field.

3. Confirm that Pre-Shared Key is selected in the Authentication Method field. [Show Me]
4. Select the format for entering your WPA encryption key. You can enter your WPA encryption key in ASCII (combination of numbers and letters) or hexadecimal (combination of numbers 0 - 9 and letters A - F) format. [Show Me]
Note: You may want to use the ASCII format because you can choose a phrase that's easier to remember. For example, you could enter "EnjoySummerBe4Its2L8" as your encryption key if you're using the ASCII format.
Enter your WPA encryption key in the Pre-Shared Key field.
- If you use the hexadecimal format, your encryption key must be 64 characters long.
- If you use ASCII format, your encryption key must be between 8 and 63 characters long.

-
Setting the group key update interval
-
1. Confirm that AES is selected in the Encryption Algorithm field. [Show Me]
2. Confirm that Group Key Update Interval is selected. One of the strengths of WPA encryption is that it self-generates a new key based on the original encryption key you enter. By enabling this field, you can control the time interval between the creation of the new encryption keys.

3. If you enabled Group Key Update Interval in the previous step, enter the number of seconds before a new WPA encryption code is automatically generated. You may want to consider a setting around 3600 seconds for the Group Key Update Interval. [Show Me]
4. Click Apply to save your WPA settings.
-
Entering the WPA2 encryption code for your Verizon MI424WR wireless network
-
1. Confirm that Pre-Shared Key is selected in the Authentication Method field.

2. Select ASCII (combination of numbers and letters) or hex (combination of numbers 0 - 9 and letters A - F) as the format for your WPA2 encryption key. You may want to use the ASCII format because you can choose a phrase that is easier to remember. For example, you could enter EnjoySummerBe4Its2L8, which is much easier to remember than 64 random hex characters. [Show Me]
o If you use the hex format, your encryption key must be 64 characters long.
o If you use ASCII format, your encryption must be between 8 - 63 characters long.
o Please create a strong, unique encryption key – do NOT use the encryption key that is printed on the label of your router or that may have been used with an older router.
3. Enter your WPA2 encryption key in ASCII or Hex format in the Pre-Shared Key field.

4. Confirm that AES is selected in the Encryption Algorithm field. [Show Me]
5. Confirm that Group Key Update Interval is selected. One of the strengths of WPA2 encryption is that it self-generates a new key based on the original encryption key you enter. By enabling this field, you can control the time interval between the creation of the new encryption keys.

6. If you enabled Group Key Update Interval in the previous step, enter the number of seconds before a new WPA2 encryption key is automatically generated. You may want to consider a setting around 3600 seconds. [Show Me]
7. Click Apply to save your WPA2 settings.
-
How can I change my Verizon MI424WR network to WPA encryption?
-
1. Open your Web browser and enter http://192.168.1.1 in the Address field. [Show Me]
2. Enter your router user name and password if prompted and click Ok. [Show Me]
3. Click the Wireless Settings icon in the top toolbar. [Show Me]
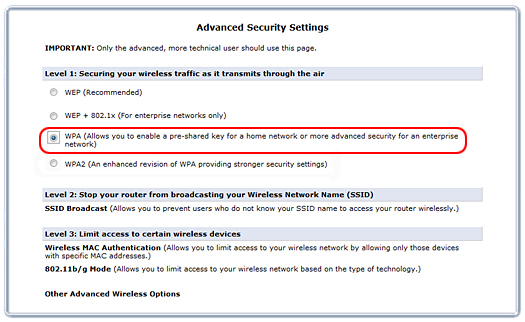
4. Click Advanced Security Settings in the left navigation panel. [Show Me]
5. Select WPA in the Level 1 section to enable WPA network encryption.
-
Entering the WPA encryption code for your Verizon MI424WR wireless network
-
1. Confirm that Pre-Shared Key is selected in the Authentication Method field.

2. Select ASCII (combination of numbers and letters) or hex (combination of numbers 0 - 9 and letters A - F) as the format for your WPA encryption key. You may want to use the ASCII format because you can choose a phrase that's easier to remember. For example, you could enter EnjoySummerBe4Its2L8, which is much easier to remember than 64 random hex characters.
o If you use the hex format, your encryption key must be 64 characters long.
o If you use ASCII format, your encryption must be between 8 - 63 characters long.
o Please create a strong, unique encryption key – do NOT use the encryption key that is printed on the label of your router or that may have been used with an older router.

3. Enter your WPA encryption key in ASCII or Hex format in the Pre-Shared Key field.
4. Confirm that AES is selected in the Encryption Algorithm field. [Show Me]
5. Confirm that Group Key Update Interval is selected. One of the strengths of WPA encryption is that it self-generates a new key based on the original encryption key you enter. By enabling this field, you can control the time interval between the creation of the new encryption keys.

6. If you enabled Group Key Update Interval in the previous step, enter the number of seconds before a new encryption key is automatically created. You may want to consider a setting around 3600 seconds for the Group Key Update Interval. [Show Me]
7. Click Apply to save your WPA settings.
-
How can I change my D-Link DI-624 wireless network to WPA-PSK encryption?
-
Verizon recommends using the strongest network security available (Wi-Fi Protected Access II, or WPA2) to protect your home wireless network and secure your information against unauthorized access. However, your current router does not support WPA2 therefore it is recommended that you upgrade your router.
The D-Link DI-624 router is not compatible with WPA2 encryption, so WPA is the preferred type of network encryption.
Note: The configuration screens may vary slightly depending on when you purchased your router and the version of firmware running on it.
1. Open your Web browser and enter http://192.168.0.1 in the Address field. [Show Me]
2. Enter your router user name and password if prompted and click Ok. [Show Me]
3. Click the Wireless button in the left navigation panel. [Show Me]
4. Confirm that On is selected in the Wireless Radio field. [Show Me]
5. Select WPA-PSK in the Authentication field.
6. Enter the WPA-PSK encryption key in the Passphrase field. It must include at least 8 alphanumeric characters. [Show Me]
7. Confirm your WPA-PSK encryption key by re-entering it in the Confirmed Passphrase field.
8. Write down your network's SSID and the new WPA-PSK encryption that you just entered. You will need this information to connect additional devices in the future.
9. Click Apply to save your new encryption settings.
10.Close the D-Link DI-624 configuration window
-
How can I change my Actiontec MI424WR wireless network to WPA encryption?
-
Verizon recommends using the strongest network security available (Wi-Fi Protected Access II, or WPA2) to protect your home wireless network and secure your information against unauthorized access. However, your current router does not support WPA2 therefore it is recommended that you upgrade your router.
The Actiontec MI424WR router is incompatible with WPA2 encryption, so WPA is the preferred encryption type.
Note: The configuration screens may vary slightly depending on when you purchased your router and the version of firmware running on it.
1. Open your Web browser and enter http://192.168.1.1 in the Address field. [Show Me]
2. Enter your router user name and password if prompted and click Ok. [Show Me]
3. Click the Wireless Settings icon in the top toolbar. [Show Me]
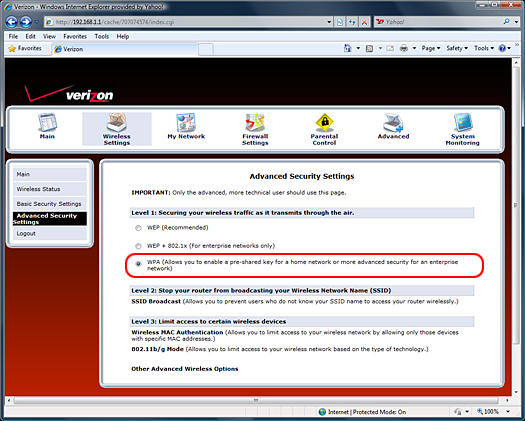
4. Click Advanced Security Settings in the left navigation panel. [Show Me]
5. Select WPA in the Level 1 section to enable WPA network encryption.
6. Confirm that Pre-Shared Key is selected in the Authentication Method field.

7. Select ASCII (combination of numbers and letters) or hex (combination of numbers 0 - 9 and letters A - F) as the format for your WPA encryption key. You may want to use the ASCII format because you can choose a phrase that's easier to remember. For example, you could enter EnjoySummerBe4Its2L8, which is much easier to remember than 64 random hex characters. [Show Me]
o If you use the hex format, your encryption key must be 64 characters long.
o If you use ASCII format, your encryption must be between 8 - 63 characters long.
o Please create a strong, unique encryption key – do NOT use the encryption key that is printed on the label of your router or that may have been used with an older router.
8. Enter your WPA encryption key in ASCII or Hex format in the Pre-Shared Key field.
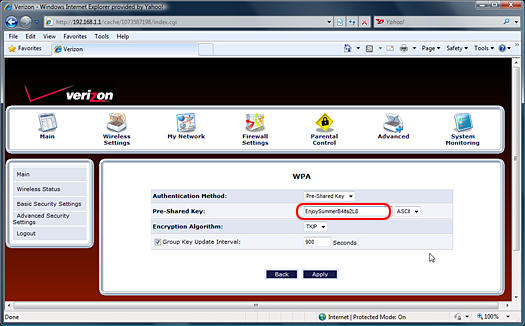
9. Confirm that AES is selected in the Encryption Algorithm field. [Show Me]
10. Confirm that Group Key Update Interval is selected. One of the strengths of WPA encryption is that it self-generates a new key based on the original encryption key you enter. By enabling this field, you can control the time interval between the creation of the new encryption keys. [Show Me]
11. If you enabled Group Key Update Interval in the previous step, enter the number of seconds in the Seconds field before a new encryption key is automatically generated. You may want to consider an interval around 3600 seconds. [Show Me]
12. Click Apply to save your WPA settings.
-
Change MI424WR Network to WPA2 Encryption
-
WPA2 should be your first choice for network encryption. It provides the most protection available on your Verizon router.
Note: The configuration screens may vary slightly depending on when you purchased your router and the version of firmware running on it.
1. Open your Web browser and enter http://192.168.1.1 in the Address field. [Show Me]
2. Enter your router user name and password if prompted and click Ok. [Show Me]
3. Click the Wireless Settings icon in the top toolbar. [Show Me]
4. Click Advanced Security Settings in the left navigation panel. [Show Me]
5. Select WPA2 in the Level 1 section to enable WPA2 network encryption.


